2B. Introduction to the Browser's Developer Tools
Overview
This section starts with an introduction to the browser's Developer Tools, a powerful suite of tools aimed at web developers that are provided by every modern web browser.Section Files
We'll be using the DWC1.bbj file during this section of the course.Concepts Covered in This Section
- Accessing the browser's Developer Tools
- A brief tour of the Developer Tools and their major features
- Modifying the text and style of a BBjControl in the Developer Tools
Developer Tools Features
The browser's Developer Tools are designed to help web developers with any imaginable web-related task, and since we're now running BBj graphical applications in a web browser, we officially qualify as web developers! Even if you've never used the browser's Developer Tools before, after these exercises you'll be able to inspect and edit a BUI or DWC app's Document Object Model (DOM) as well as the DIVs that comprise every BBjControl.
The tools help us with a number of different tasks including:
- Editing the DOM elements (BBjControls) directly in the Elements/Inspector tab by accessing their HTML, text, class names, attributes, inline styles, etc.
- Accessing the Console to view messages & errors, debug programs, and execute JavaScript
- Viewing all CSS styles associated with an element from all sources, as well as which styles were chosen and which were ignored when there are several possibilities
- Viewing all the sources including cookies and local/session storage, as well as the source for all images, scripts, and stylesheets with the ability to pretty-print minified sources
- Profiling network and memory performance, including the ability to artificially throttle bandwidth to simulate slower networks
- Simulating responsive and mobile devices, which really comes in handy when testing CSS layouts
The tools offer far more features, with more being added every month. In fact, it's common to see the What's New tab full of new goodies if you haven't opened up the Developer Tools in a while.
Example 1 - Opening the Browser's Developer Tools
1) Begin by loading the DWC1.bbj program from the first chapter and then run it in the DWC. If the program runs inside a browser window in Eclipse, you will want to reconfigure Eclipse to use your default system browser instead as covered in Section 1 Notes. This step is critical as we will be using the browser's Developer Tools throughout the following exercises.
2) Open the browser's Developer Tools. This can be done in a variety of ways, including:
- Context Menu: Right-click on the page (or a BBjControl of interest) and choose the 'Inspect' (Chrome, Edge, and Firefox) or 'Inspect Element' (Safari) option from the context menu
- Menu Bar: Navigating the browser's menu and choosing the 'Developer Tools' option. The specific menu path varies by browser. For Chrome, the path is View > Developer > Developer Tools. In Edge, the path is Tools > Developer > Developer Tools. In Edge, the path is Tools > Browser Tools > Web Developer Tools. In Safari, the path is Develop > Show Web Inspector.
- Keyboard: Pressing the keystroke combination associated with the menu option in #2 above. On Windows press [F12] or CONTROL-SHIFT-I (Ctrl + Shift + I), and on macOS press COMMAND-OPTION-I (⌘ + ⌥ + I)
While the third option is probably the fastest, the first option has the added benefit of selecting the Elements tab, expanding the DOM, and highlighting the code for the element that you clicked. You may want to experiment with the tools provided by different browsers, as you might find that one browser is easier to use or provides more helpful tools (especially when it comes to looking at layouts) than others. For example, Microsoft Edge lets you maintain quick view sections so that you can see the Elements, Console, Styles, and Computed Styles all at the same time.
3) The Developer Tools offer their own configuration options, and one of the most important parameters is the dock location. You can configure the Developer Tools so that they are displayed horizontally below the web page, vertically to the left or right of the page, or in a separate window. There may be times when you want the browser window to be very narrow, in which case you can display the tools in a separate window so that they will have plenty of screen space to show everything without feeling cramped. You can also configure the light/dark mode for the tools, which light or dark theme to use, the default color format, and more. If you're new to the Developer Tools, you may want to look at the links in the Useful Resource Links section of this course.
4) In the Developer Tools, familiarize yourself with the following tabbed sections (see the notes at the end of this page for a screenshot of the Developer Tools with these sections highlighted) as they will be used often:
- Elements - displays the DOM, or the underlying HTML, that makes up the DWC app
- Console - displays output from the DWC, messages, warnings, errors, and potentially output from your BBj app if you executed JavaScript to output information to the console
- Application - displays information about the page with some of the useful points being cookies, as well as all the app's sources including images, scripts, and stylesheets
- Styles - displays all the styles for the currently selected element from all style sheets. The Computed styles tab is similar, but only lists the style rules that are actually in effect for the element, ignoring all other style rules. In other words, these are the rules that dictate how the element is rendered on the screen.
Example 2 - Modifying a DWC App in the Developer Tools
1) Now that the DWC1.bbj program from the first chapter is running in the browser and we're displaying the Developer Tools, we're going to modify the controls directly from the Developer Tools. Start by finding the element associated with the BBj app's title bar text and modify it inside the Elements tab. You can select the title bar's text in several ways, including:
- Clicking the element selection tool (
 ) at the top left of the Developer Tools drawer and then clicking on the text in the BBj app's title bar
 - Searching for the "dwc-frame-titlebar-text" class name in the Elements tab using the typical CONTROL-F on Windows or COMMAND-F on macOS, then pasting in the class name for the search term. There should be two results: one result will highlight an included CSS style, and another will be the actual element. Use the steppers (
 ) to iterate over the matching elements until the title bar DIV is highlighted in yellow
 - Expanding the disclosure triangles for the DOM elements in the Elements tab until you reach the DIV with the "dwc-frame-titlebar-text" class name
Once you have found the correct DIV element for the title bar, change the text from "Hello BBj DWC" to something else. This can be done by either:
- Right-clicking on the element's text and choosing "Edit Text" from the popup menu
- Double-clicking on the element's text to put it into edit mode and typing in different text
2) Change the color of the app's title to green. Hint, after selecting the correct DOM element as covered above, go to the Styles tab and look for the style definition of the "dwc-frame-titlebar-text" class. It should have a few CSS properties defined, such as "margin" and "text-align". Add another style by clicking the closing curly brace (}) and typing in "color: green" without the quotes. This should change the BBj app's title text to green. See the example in the animated GIF below for an example of how to change this CSS property's value. After changing the title's text and color, the app's title bar should look similar to the following:
![]()
3) Notice that the styles for the title element as listed in the Styles tab in the Developer Tools are preceded with a checkbox when you mouse over that area That's a quick way for us to enable/disable a particular CSS style by checking or unchecking the preceding checkbox. Try disabling the "text-align" property and see how the text in the BBj app's title bar is affected.
4) Change the color value from green to a DWC CSS custom property. Hint: change "green" to something like "var(--dwc-color-danger)". We'll cover the DWC's CSS custom properties like "--dwc-color-danger" in more detail in the next section. Note that after you type in "var(", you will see a popup with code completion of all the DWC's CSS variables for colors, including their name and swatch as shown below: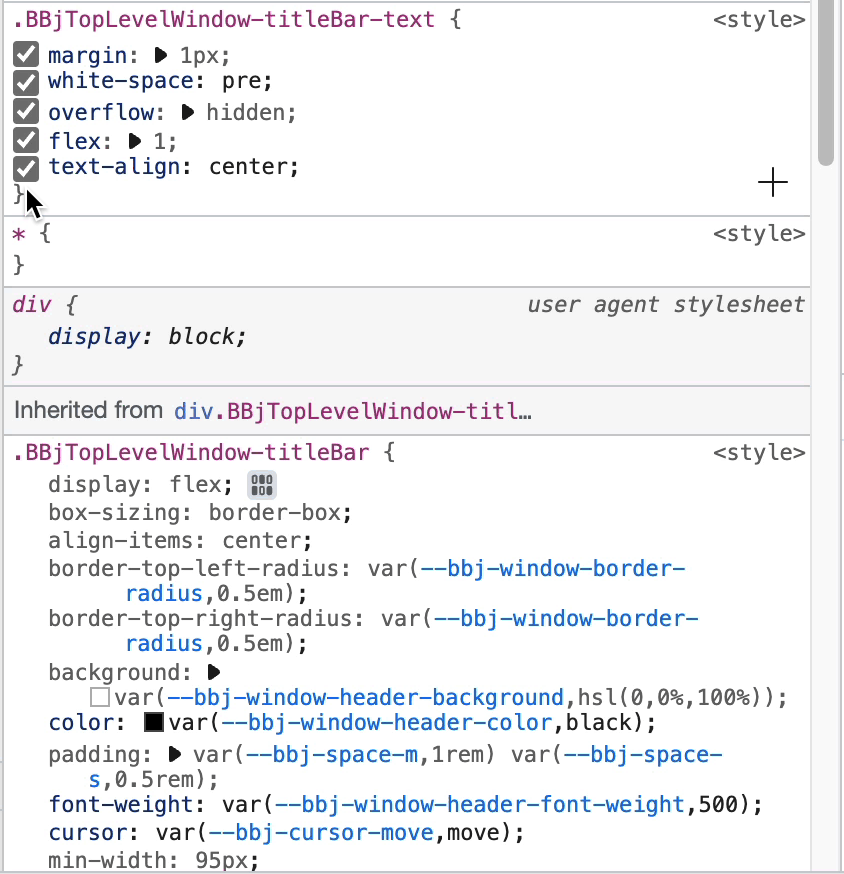
Example 3 - Setting CSS Styles on Controls
1) Instead of modifying the styles for the app in the Developer Tools, this time we will affect the appearance of controls in BBj code. To do this, locate a label (dwc-static-text control) in the source code (st!) and execute the following method on it to set the text color to green: .setStyle("color", "green"). Run the program again to see how this affected the text in the control.
2) Instead of setting the text to a hard-coded value of "green", this time set it to the DWC's CSS custom property for the "info" component theme: .setStyle("color", "var(--dwc-color-info)"). If all goes well, the label's text should be purple.
Going the Extra Mile
1) Previously, we set the label's foreground color to the purple info theme but this time we want to change the background color. Use the same .setStye() method from step 1 above, but this time the property should be "background" and the value should be "var(--dwc-color-warning-90)". That means that the background of the label will end up being a fairly light shade of yellow, as we're using the 'warning' component theme that's yellowish-orange and the '-90' ending indicates that the lightness will be at 90%, where 0% is completely dark (black) and 100% is completely light (white). If all goes well, the label should look like the following:
![]()
btn!.setAttribute("expanse","xl")
REM btn!.setAttribute("theme","success")
btn!.setStyle("color", "var(--dwc-color-info")
btn!.setStyle("background-color", "var(--dwc-color-warning-90")
If you attempt to set the 'background-color' CSS property in this manner, you'll notice that the light yellow coloring is only visible in the corners of the button:Now change the code so that instead of changing the "background-color" property, it sets the "background" property instead. You'll notice that this time we got the results that we expected:
That's because the "background-color" CSS property specifies only the color property of the background. But a background may have multiple properties such as a background color and background image. The "background" property in CSS is known as a shorthand property that combines multiple properties into a single value. To elaborate, the "background" property is a shorthand for eight constituent CSS properties that together set the background's attachment, clipping, color, image, origin, position, repeatability, and size. So when our code set the "background" to "yellow", it was affecting much more of the control than just the color of the background.
Be aware that when combining multiple properties into a shorthand property like "background", the order of the values can make a difference. Additionally, the "background" property may have multiple layers, or background definitions, separated by a comma. For example, the following is a much more complex value for the "background" property:
logo$ = "'https://basis.cloud/wp-content/uploads/2023/07/logo_basis_v2.svg'"That code results in the window's background looking like this:
texture$ = "'https://public.basis.cloud/Training/images/lightSwirls.jpg'"
value$ = "url(" + logo$ + ") left 1em bottom 0.5em/auto 25% no-repeat, url(" + texture$ + ") left top/150px repeat"
wnd!.setStyle("background", value$)

More Information About the Browser's Developer Tools
1) The screenshot below shows the DWC1 BBj program running in the DWC in the Google Chrom browser with the Developer Tools displayed. The Elements, Styles, and Console sections are used often and highlighted in orange.
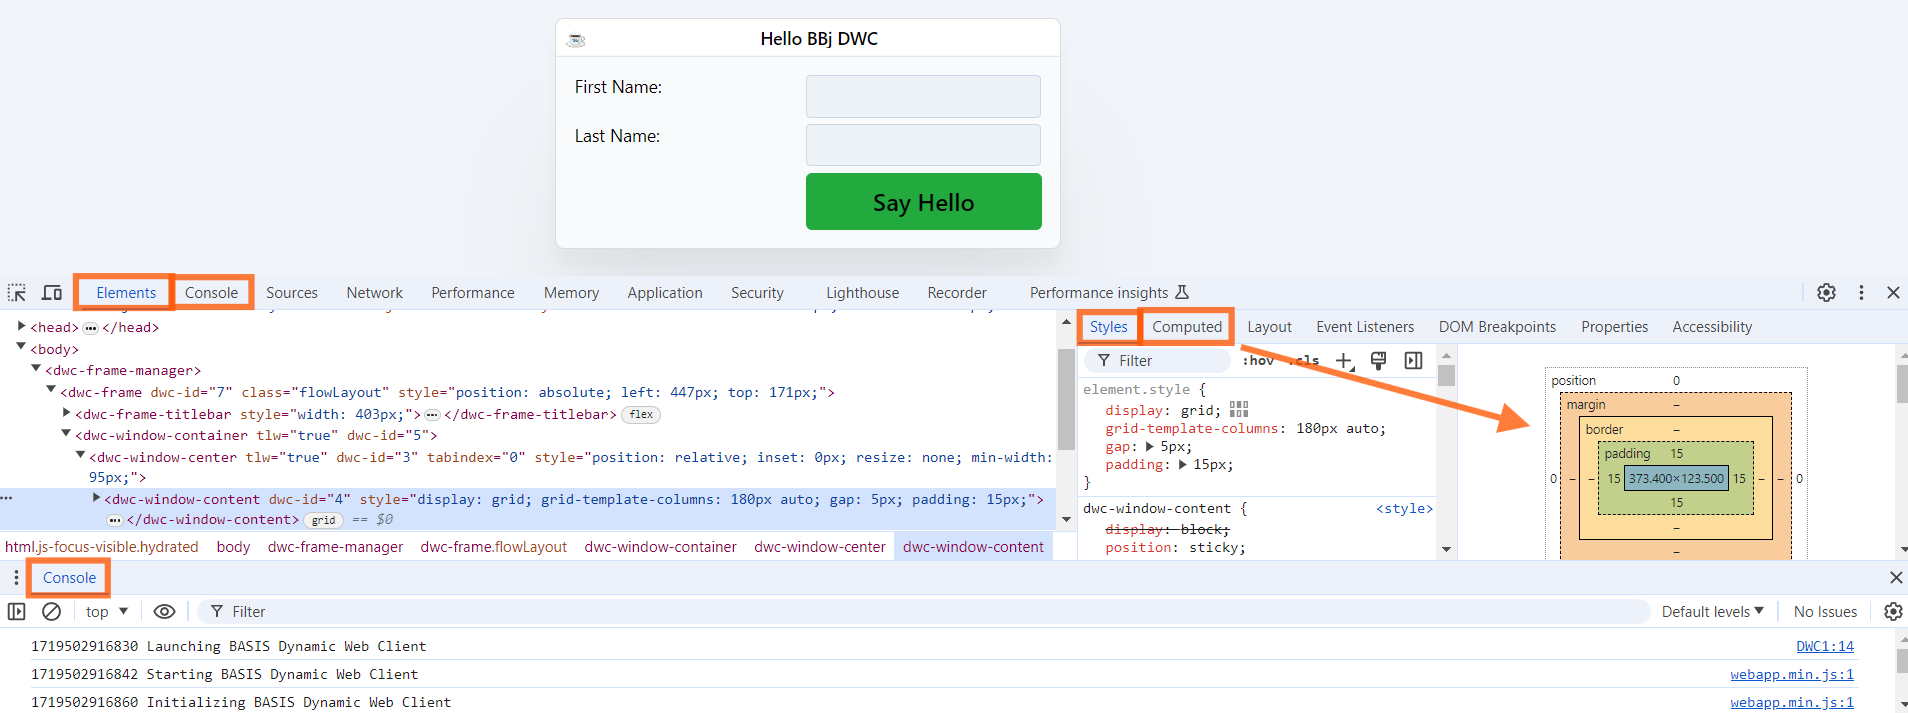
2) When you select an element (like a DIV in the Elements section), the Styles section will be populated with style information about the selected element. For example, selecting the element associated with the window's title bar results in the following shown in the Styles section:
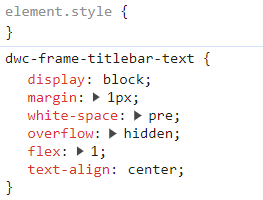
We can interactively manage these styles on-the-fly by adding new ones, modifying the values of existing properties, and disabling/deleting them. In the screenshot above, the element.style section corresponds to an inline style on the element and when we add a style there it only affects that single selected element. The middle section corresponds to shared styles that apply to all elements with the dwc-frame-titlebar-text class name (notice the period preceding the class name in the screenshot). If we change the value of one of those properties, it has the potential to change multiple titles if there were multiple top-level windows visible. The bottom section with the asterisk (*) indicates that any styles in this block will apply to all elements in the DOM.
The following screenshot shows what the title bar element's Styles section looks like after adding color styles with different values in each of the sections:
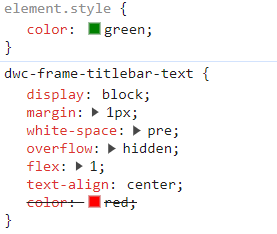
The top element.style green color style takes precedence over the colors in the other two sections because inline styles always overwrite normal styles and can be thought of as having the highest specificity. See the Mozilla documentation on specificity for more information on how browsers determine which style is most relevant to the element when there are multiple declarations that conflict with one another. Notice that the color declarations in the middle and bottom sections are crossed out, indicating that those are not being used because they have been overridden by another declaration.
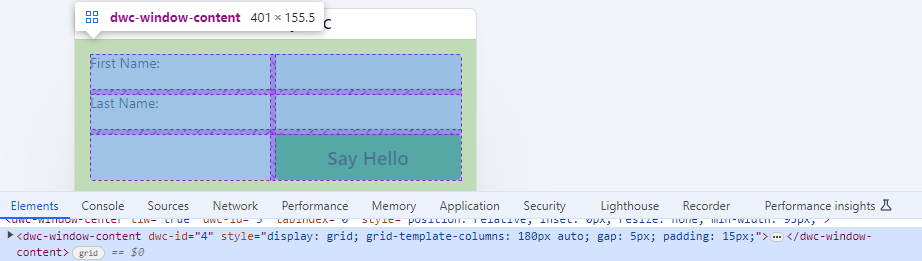
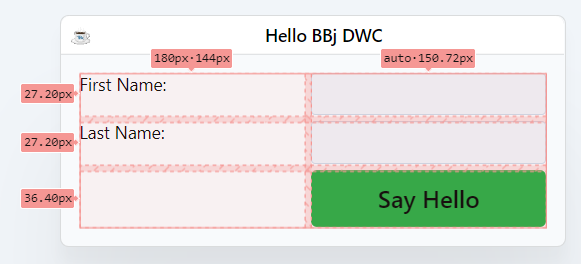
3) Clicking on the window's panel in the Elements tab when running the DWC1.bbj program overlays a grid on the app showing the padding (green), the CSS Grid's gap (purple), and the CSS Grid's cells (blue) that contain the BBj controls, as shown below. Note that the element has the following class names: dwc-window-container, dwc-window-center and dwc-window-content. The dwc-window-content class name corresponds to the BBj code that defines the CSS Grid by calling the setPanelStyle() method and providing the display property and grid value.