7A. Control Validation
Overview
This section covers the DWC's validation, which covers the ways that we ensure that the user has entered valid data into an input form.Concepts Covered in This Section
- Form validation
- Client-side validation
- Built-in validation
- JavaScript validation
- Validation customization
Form Validation
Form validation is the process of ensuring that the information filled in by the end-user is valid to avoid sending incorrect data back to the server. BBj programs can take advantage of server-side validation by setting a callback on a BBjButton for the ON_FORM_VALIDATION BBjFormValidationEvent. After the end-user fills out the form and clicks the submit button, the contents of the form are sent to the server and BBj locks the top-level window, disabling all further user input. The callback code for the submit button is executed, and the program can get the contents of all the input controls from the BBjFormValidationEvent. After the callback code reviews the input, it must decide if the data in valid or not and call the accept() method passing in either a 1 or 0 to indicate that the data is valid or not. After executing that method, BBj unlocks the top-level window.This style of form validation has been available since BBj 6.0, and is valid for all clients. In fact, the BASIS Product Download Page is a BUI program that uses form validation as detailed in The Anatomy of a Web App Makeover Advantage article. This style of form validation is still valid, but it does all the data processing on the server which means that the client has to send the data to the server to be validated. One possible improvement would be to implement some sort of client-side validation, which would be able to give the user instantaneous feedback as to whether a form's fields were valid or not.
Example 1 - Form Validation
1) Start by running the DWCTraining/07_ControlValiation/formValidation.bbj program.2) Click the [Submit] button without filling out the first and last name fields. The button has a callback set for the form validation event:
btnSubmit!.setCallback(BBjButton.ON_FORM_VALIDATION, "OnFormValidation")The callback for the form validation is listed below, and it starts by getting the contents of the first and last name edit box controls from the BBjFormValidationEvent. Because the validation event contains the value of every control on the window, we can get all the information that the user entered from the event itself instead of using each control's getText() method. This is critical for performance, as the code doesn't require any round trips in order to access the information from the input form.
OnFormValidation:After the code gets the first and last names, it checks the result of ANDing the length of each. If either or both of the fields are empty, this results in a boolean FALSE which means that the form's content is not valid. In that case, it calls the accept() method on the form validation event and passes in a zero to indicate that the form contains invalid data and has been rejected. It then alerts the user and lets them know that the first two fields are required, as shown below:
e! = BBjAPI().getSysGui().getLastEvent()
firstName! = e!.getText(editFirstName!)
lastName! = e!.getText(editLastName!)
if (len(firstName!) AND len(lastName!)) then
e!.accept(1)
temp = msgbox("You filled in the form successfully!", BBjSysGui.MSGBOX_ICON_INFORMATION, "Form Submitted Successfully", mode="theme=success")
else
e!.accept(0)
temp = msgbox("You didn't fill in your first and last names, which are required", BBjSysGui.MSGBOX_ICON_STOP, "Invalid Input", mode="theme=danger")
endif
return

This is a fairly simplistic example, as the user could just add a space in each of the name fields and that would be enough to pass our rudimentary validation. In a real world example, the validation routine would probably trim() the strings and ensure that their length was greater than some minimum acceptable value.
Client-side Validation
One of the benefits of adding in client-side validation is that the user gets real-time feedback about potential errors when filling out a form. For example, they can know right away if the data that they entered in a field is invalid without needing to press the [Submit] button to kick off form validation. This would beneficial to BBj applications, and there was even an enhancement request entered for this feature in early 2012: Bug 24625 - Allow for optional client-side validation functions based on arbitrary developer-defined JavaScript code.Client-side validation should be considered as the first of multiple checks for the data, and helps to improve the user's experience by catching errors and problems right away without having to be sent to the server, processed and potentially rejected. That can cause a noticeable delay due to the round-trip required to let the user know that their data needs to be corrected. In contrast, with client-side validation the user knows right away when their entered data is correct or not. However, it's worth mentioning that client-side validation should only be considered a first step, and not the complete validation solution. In order for your app to be as secure as possible, it should perform a form-level validation at the server after all the client-side validations have passed successfully.
This style of validation is now available in the DWC, and the user's data is validated by the browser before the data is sent to the server for form validation. The DWC offers two types of client-side validation:
- Built-in validation, such as setting a BBjEditBox to "required" to indicate that it needs to be filled out to be valid.
- JavaScript validation, where the control's data is processed by arbitrary developer-defined JavaScript code that returns a boolean indicating whether the data is valid or not.
It's no coincidence that the second option sounds a lot like the enhancement request, as that was the catalyst for the feature addition.
Built-In Validation
The DWC's validation documentation lists the types of built-in validation that are available for particular BBj control types. For example, a BBjEditBox offers several types of built-in validation:
BBjEditBox
| Attribute | Description |
|---|---|
required |
The control needs to be filled in before the form can be submitted |
minlength, maxlength |
Specifies the minimum and maximum length of textual data (strings) |
min, max |
Specifies the minimum and maximum values of numerical input types |
type |
Specifies whether the data needs to be a number, an email address, or some other specific preset type |
pattern |
Specifies a regular expression that defines a pattern the entered data needs to follow. |
From the table above, we can see that we could make use of the "required" attribute in our previous example that used form validation to ensure that the first and last name fields were filled in appropriately. Additionally, zip codes follow a distinct pattern where they're either 5-digits long, or contain 5 digits followed by a dash and 4 more digits. That's another field that we can add some built-in client-side validation to.
Example 2 - Built-in Client-Side Validation
1) Start by running the DWCTraining/07_ControlValiation/builtInValidation.bbj program, which is similar to our previous example program except that this program also incorporates client-side validation via attributes in the DWC.2) The program ensures that the name fields are filled in by setting them to be required, as shown below:
    editFirstName!.setAttribute("required", "true")
    editLastName!.setAttribute("required", "true")
Now that those fields are configured to be required, we can't submit the form unless both fields have been filled with data. If we only fill in the first name and don't fill in the last name, the input control turns red to indicate that it's invalid: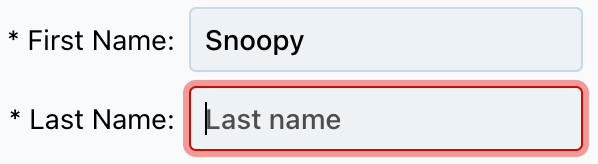
Try to submit the form without filling in one or both of those fields to see what happens.
3) Note that when our app ran initially, the first and last name fields were empty, and yet they were not marked as invalid with a red border:

| Attribute | Description | Type | Default |
|---|---|---|---|
auto-validate |
When true, the control will be validated with every change | boolean |
true |
auto-validate-on-load |
When true, the control will be validated when it is loaded for the first time | boolean |
false |
auto-was-validated |
When true, the control will switch on the valid property automatically after the control is validated and has is valid |
boolean |
false |
Given the table above, we can add a couple more lines of code to set the auto-validate-on-load attribute to TRUE for the two name input controls, as in:
    editFirstName!.setAttribute("required", "true")
    editFirstName!.setAttribute("auto-validate-on-load", "true")
    editLastName!.setAttribute("required", "true")
    editLastName!.setAttribute("auto-validate-on-load", "true")
With this code in place, the name fields are now initially displayed as invalid before the user ever interacts with the form: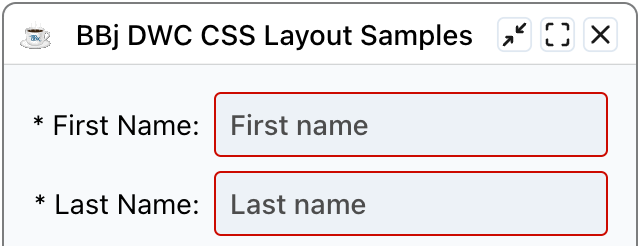
4) The program also sets the pattern attribute for the zip code field and supplies a regular expression so that the field must contain either 5 digits, or 5 digits followed by a dash and 4 more digits. The details of the regular expression are broken down and explained in the comments at the top of the program. For more regex information and online testing capabilities, take a look at https://regex101.com/, as it offers the ability to do live regex testing for matches, substitution, and more all while providing a breakdown of the pattern. Here's a quick preview of their explanation:
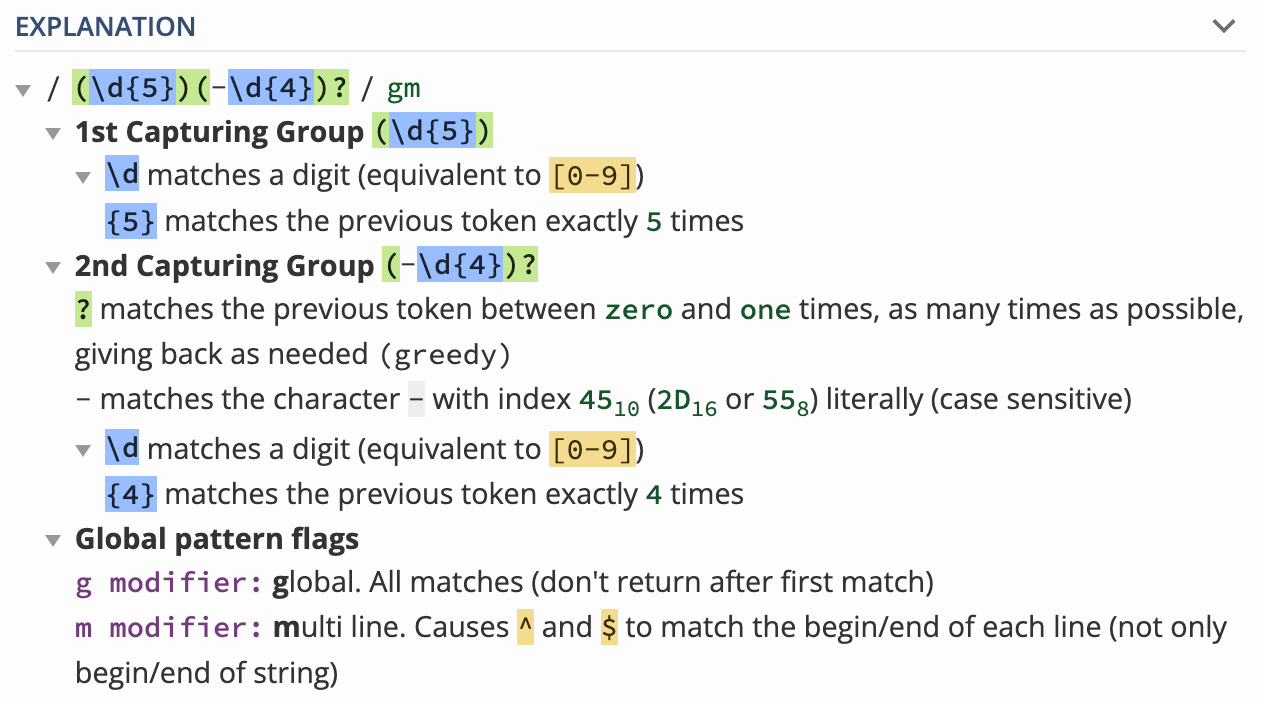
The code that enables this type of built-in validation appears below:
editZip!.setAttribute("pattern", "(\d{5})(-\d{4})?")
with that code in place, the edit box will only be considered valid when it has the regular zip code (87109), or the extended zip code (87109-1234) set, as shown below:
![]()
Notice the control is considered valid even when empty, as opposed to the name fields, because we didn't configure this field to be required. In a real-world example, if we required the user's address then their zip code would indeed be required and we'd have to add that attribute as well.
JavaScript Validation
The last style of validation available is the developer-defined JavaScript expression. While you normally don't need to know or write any JavaScript to take advantage of the DWC's features, this is one exception to that rule since the entire client-side validation routine is handled by a JavaScript function that you write. It takes the contents of the control as input, then does whatever is necessary to determine if the provided content is valid or not. After determining the validity of the input, the function simply returns a TRUE or FALSE to indicate whether the input is valid or not. This style of validation does require a little more effort on the developer's part, but it's intended to be used when the existing built-validation method such as "required" or "pattern" are not powerful or comprehensive enough to fully validate the input. You might also want to go this route if your validation routine consisted of several tests, where the input must pass multiple checks in order to be considered valid. However, we don't necessarily need to use complex examples to get a feel for how this type of validation works. There's nothing stopping us from implementing one of the easier built-in validation styles via this method instead of via the control's attribute. That's a good place to start, and it's our next example.Example 3 - Client-Side JavaScript Validation That Replicates the "required" Attribute
1) Start by loading the DWCTraining/07_ControlValiation/javaScriptValidation-Required.bbj program and running it in the DWC.2) Attempt to submit the form without filling in the first name edit box. The validation will fail because the edit box is empty, and we see a custom validation error message:
That shows that our custom JavaScript function worked and emulated the same behavior that we previously saw with the "required" built-in validation. Here's the code that's responsible for the client-side validation:
rem Define the JavaScript function that determines if the provided inputThe JavaScript was pretty simple, and used an if/else conditional based on the length of the trimmed content from the edit box. In this example, we also set a custom validation error message, which is displayed by default in a "popover" style below the control as shown in the screenshot above. If we wanted to change the location of the error message, we could choose the preferred placement as it relates to the edit box control via the "validation-popover-placement" attribute. For example, the following code would cause the popover to be displayed to the right of the edit box:
rem is valid or not. Since this replicates the "required" attribute, the
rem JavaScript only has to ensure that the control's contents are not empty.
js! = "if (value.trim().length > 0) { "
js! = js! + " return true; "
js! = js! + "} else {"
js! = js! + " return false;"
js! = js! + "} "
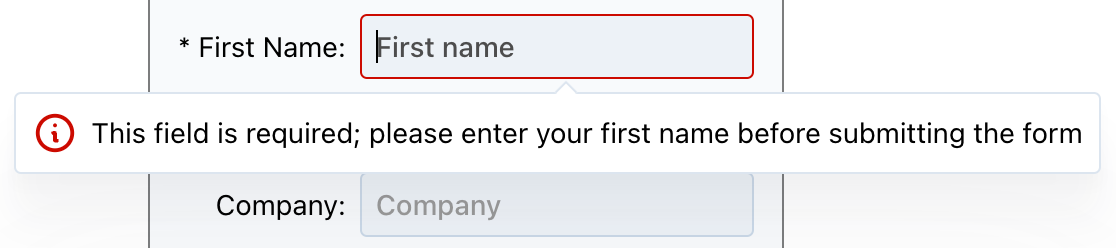
editFirstName!.setClientValidationFunction(js!)
editFirstName!.setClientValidationMessage("This field is required; please enter your first name before submitting the form")
editFirstName!.setAttribute("validation-popover-placement", "right")3) Fill in the first name edit box with a bunch of spaces and notice that the control is still considered invalid. That's different behavior than we saw in Example 2 above when we set the "required" attribute. That built-in validation only ensured that the control was not empty, and our JavaScript goes one step further by removing the leading and trailing spaces via the trim() method. Because of that, our custom JavaScript validation routine is a little bit more stringent than the built-in "required" validation.4) For the last name validation, our code is similar to what we did with the first name but this time we made a couple of interesting changes. For starters, we greatly simplified the validation function to get rid of the if/else conditional, as shown in the highlighted code excerpt below:
rem The first example could be written in a much more compact manner, soThe last line set the style of the validation to be "inline" instead of the default "popover", so when we attempt to submit the form without entering a value for the last name, the DWC inserts the error message just below the edit control instead of showing it in a small floating window as we saw in step 2 above. The following animation shows that when we clear out the contents of the last name edit box the control is considered invalid based on our client-side JavaScript function. And since it also uses the trim() method we can fill the edit box with spaces and the contents are still considered to be invalid. When that happens, the next "Company" field is shifted down and the validation error message is displayed inline just underneath the associated edit box as shown below:
rem we'll use that version for the last name. Our function is simply
rem using the trim() method to remove leading and trailing spaces, then
rem returning the length property of the trimmed input. That satisfies
rem our boolean return value, as an empty string has a zero length and
rem thus would be invalid. Any other length value would resolve to true.
rem Additionally, we'll change this message to be inserted in the form
rem as an inline element instead of a popover.
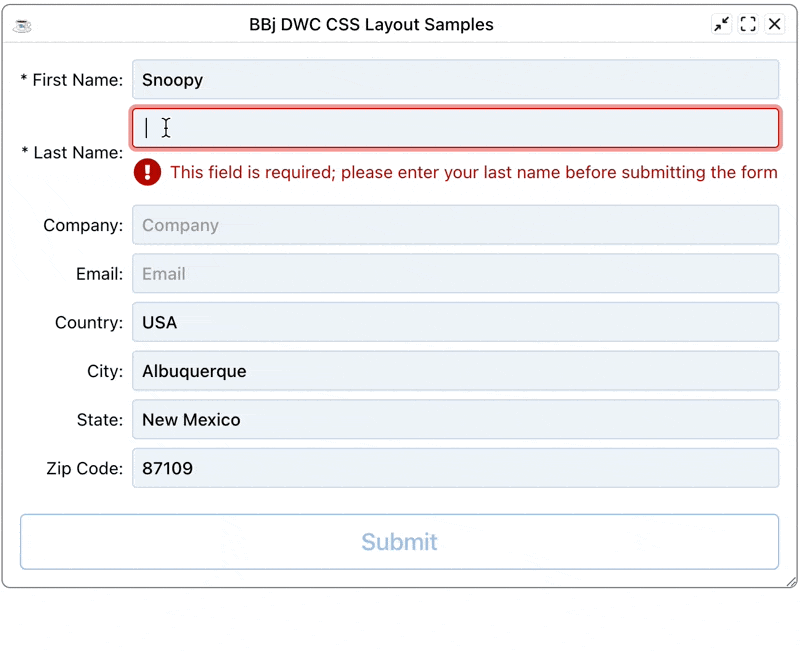
editLastName!.setClientValidationFunction("return value.trim().length;")
editLastName!.setClientValidationMessage("This field is required; please enter your last name before submitting the form")
editLastName!.setAttribute("validation-style", "inline")
Validation Customization
In the previous example, we started customizing the client-side validation by changing the style from popover to inline and providing a custom error message. But the DWC's Validation Customization documentation lists several more configuration parameters that we can take advantage of. For starters, we can modify the icon that's displayed with the error message via the "validation-icon" attribute. Shown below are three different code samples that each produce a custom icon from the Font Awesome library, along with a screenshot of the resultant error message that's displayed to the user:editLastName!.setAttribute("validation-icon", "fa:thumbs-down")
editLastName!.setAttribute("validation-icon", "fa:hand-paper")
editLastName!.setAttribute("validation-icon", "fa:fas-exclamation-circle")
Those examples used the Font Awesome icon pool, but we could have also chosen icons from the Tabler, Feather, or BBj icon pools. Additionally, we could also provide the icon via a URL or via a data URL that uses base64-encoded image data, as shown below (but with a truncated version of the lengthy base64-encoded data URI to save space):
    base64Icon! = "data:image/png;base64,iVBOR..."
    editLastName!.setAttribute("validation-icon", base64Icon!)
Which results in the following customized error message with our custom PNG image that was converted to base64:
![]()
Disabling the Submit Button
One more interesting configuration option is the "validation-auto-disable" attribute. This attribute is set to false by default, but when we set it to true it causes the the form's submit button to be disabled until the control has valid contents. The documentation also lists this point of information:
Note: It is also possible to set theses attributes on the closest BBjWindow instead of settings them on a per-control basis. When setting the attribute on a window, the attribute name must be prefixed with 'data-'.
To test this out, we can add the following line of code to our program:
window!.setAttribute("data-validation-auto-disable", "true")Since we set the attribute on the window, we prefixed the desired attribute (validation-auto-disable) with the 'data-' prefix as described in the documentation note. With this line of code in place, the [Submit] button will be disabled if the first and/or last name fields are invalid. Once they both pass the client-side validation from our JavaScript code, the DWC enables the [Submit] button, as shown below: